
This is the third of three blogs aimed at covering my favourite bits of Clicker 6. There are a number of changes in Clicker 6 which support students to become more independent readers and writers – or which provide support for teachers to make or access resources more quickly.
I love using Clicker for reading – both in guided reading with a class group and as an individual tool in the self selected reading block. Many of the students I work with have different abilities, and I can use the features within Clicker to accommodate many of their needs – making it perfect for Universal Design for Learning (UDL) both in group and individual reading time. Clicker also has multiple access methods – users can access it with a mouse, with a pointing device or with one or two switches and a Crick USB Switch Interface. This means that ALL students can turn pages and access other buttons independently within Clicker. (And Clicker 6 adds a mouse dwell feature which makes it more compatible with alternative pointing devices such as a Tracker Pro).
I also like using Clicker 6 as a reading platform because the word by word highlighting can help teach early readers many of the important concepts about print. Word by word highlighting coupled with text-to-speech helps to reinforce that text is a code for speech by consistently matching text with spoken words. Word-by-word highlighting helps to reinforce the difference between text and pictures and that text carries the message. It also helps students to understand that text goes from left to right – and that at the end of a row a reader needs to sweep down and across to the beginning of the next line of text. However, some students were unable to follow the word by word highlighting in Clicker 5 because it was too fine – so I was very happy to see an option in Clicker 6 to block highlight the background behind each word – giving a much thicker and easier to follow visual cue. (And on this topic, it is important to note that we don’t want to use word-by-word highlighting forever – and Clicker offers the option of turning it off. Once a student becomes a more competent reader they need to develop eye movements to enable them to read more efficiently – which means they need to move away from a straight linear movement.)
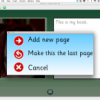
Another new feature in Clicker 6 that will promote independent reading and writing is the way that Clicker Sets are now more easily created by everyone. There is a new feature called Click and Edit which makes creating a book (or other Clicker Sets) very easy. Upon opening Clicker 6, a user can select to Make a Book from the Quick Start menu. Once this has been selected an empty book template pops up and the student can now write a book, supported by all the word processing features including word prediction and text-to-speech. Pictures are added using the same tools as the word processor – with options for drawing your own picture, adding a picture from the web cam or using a picture already stored on your computer. Once each page is written, the user just needs to hit the forward arrow to be offered the option of adding a page, finishing the book or going back to edit the current page. And when they have completed the book they can turn off Click and Edit to stop others making changes easily.While Click and Edit is aimed at helping students to write their own books I can also see that it will help many others too – easy creation and editing tools are always appreciated! Ann Crick has written lots more about the new Click and Edit feature at the Crick Software Blog.
And finally – my other favourite new feature of Clicker 6 is the range of formats in which they have created some of the new Quick Page Wizards. As a speech pathologist and special educator I appreciate the way many of these are structured for speech and language activities as well as literacy.
Not only can you create a book (with a range of appropriate supports for different students), but there are other page wizards:
- Listen and Say (for creating a listen and record activity with words and pictures);
- Tell the Story (for creating a picture supported story telling activity);
- Talk About (for creating picture supported chat about different topics); and
- Matching.
I’ll be using some of these with all students – including students who use Augementative and Alternative Communication (AAC). A great range of options for getting creative!
And on that note, this little series of blogs about Clicker 6 is done – even though I still keep finding extra changes and tweaks which make this piece of software an even more impressive tool. My remaining greatest wish now for Clicker 6 is an iPad version – or a player so that I can run my Clicker sets on my iPad. Hopefully Crick Software is thinking about this too!
And I hope you enjoy using Clicker 6 as much as I do :).
kim west
Jane
Donna Gilson
jane