The latest operating system for the iPad/iPhone/iPod touch, iOS 7, has introduced some major changes to the accessibility of these devices. In particular, switch access is now built right into the accessibility options, providing operating system level alternative access to these tablet devices for the first time – and this update is the main purpose for this blog post. In addition, there are also a range of apps that have switch access built into the app itself – and I’ll cover those apps and the options for switch interfaces too as I believe these still have a relevant place in the switch options for iOS.
(Edited to add: some of the hardware and videos mentioned in this blog post are no longer available)
And before I go on – I just want to apologise in advance as this is a REALLY long blog post with several videos but I wanted to cover this topic thoroughly.
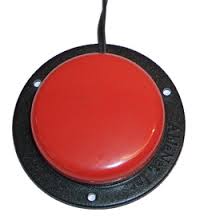
Switch Access to iOS7
As mentioned above, Apple has now added switch access into iOS 7 as a standard Accessibility feature. For those of you who tried to use the old VoiceOver based scanning in iOS 6, this new feature should be a big improvement. It is much more user friendly – and is more typical of the sort of switch access we are accustomed to in other assistive technologies. It isn’t, however, something that works seamlessly with all apps – it is up to each app developer to build in support for this form of access. Apple has done a great job in making it as flexible as possible but there are still apps, or features in apps, that it isn’t compatible with. You’ll see some examples of this in the videos below. Generally, you can be sure that Apple apps will be compatible and that the iOS is compatible as well.
And before I get too far into this blog post I wanted to strongly recommend the fabulous booklet from AbleNet iOS 7 Switch Control: The Missing User Guide (edited to add – this guide is no longer available). It truly is the missing manual – and thank goodness that they put it together!! If you are looking at setting up Switch Control and want a plain English explanation of the settings then this is the booklet for you!
Now – back to iOS 7….
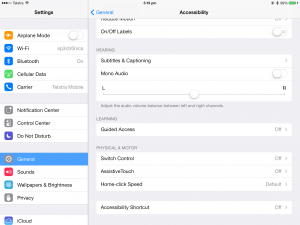
Accessibility is now much higher up the list of items in the General Menu under Settings (hooray!). Once you go into the Accessibility settings, you will need to scroll down to the “Physical & Motor” category to find Switch Control.
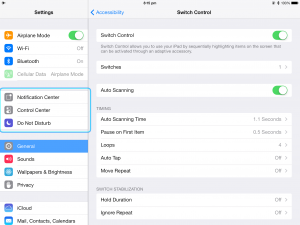
Once you enter the Switch Control section of Accessibility Settings then you need to turn Switch Control on. Immediately, you should see a scanning box moving around your screen. However, unless you have previously turned on Switch Control on and setup some switches, you won’t have any way to control this scanning box as yet and after a short period of time, the box will stop moving around.
Switches
Apple is using the word switches in a very general way, as there are a range of options that can be used as a switch with this new feature. If you go into the “Switches” section you will see a box titled “Add New Switch”. Selecting this box, takes you to a further menu that allows you determine whether you are going to use an external switch, the iPad screen or the camera.
We’ll start by talking about the external switch options as this is the most varied and complex!
External Switch Options
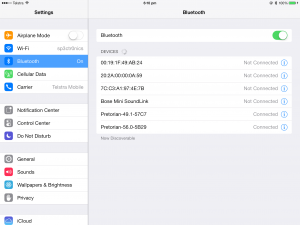
Before setting up your external switch, you need to have a device connected to your iPad or iPhone via Bluetooth that can send a “switch” or a “key” press. This can include a Bluetooth keyboard or most of the pre-existing iPad switch interfaces. To setup a Bluetooth keyboard or switch interface, you simply need to make sure that your external keyboard or interface is “discoverable” (check the manual) and then go to the Bluetooth menu in Settings. Pair the device with the iPad also following the instructions in the manual for the device. It will then appear in the Bluetooth menu as connected.
I was able to use the Apple Wireless Keyboard, the APPlicator from Pretorian, the Blue2 from AbleNet (and please note – the information from AbleNet is that only the Blue2 interfaces that require a passcode are currently compatible), the Switch2Scan from Pretorian, the older Tecla Shield and the SimplyWorks switch options from Pretorian and Inclusive. All of these interfaces worked with the new iOS 7 Switch Control, although I did need to turn my iPad completely off and then on again when changing between interfaces and I had to make sure that each of them was set to send a typical keyboard keypress such as a letter, number or enter. I was also able to use the new Tecla Shield DOS – although that shouldn’t be that surprising as it was released after the iOS 7 beta became available. Christopher Hills has also produced a preliminary video where he uses the Tecla Shield DOS with iOS 7 – and I can’t wait to watch his next video which should give us a much more thorough review both of the Tecla Shield and also of how he has used Switch Control.
I was also able to set the J-Pad and the Simply Works Joystick up. I was able to set the left and right movements of these joysticks to each have a different function in Switch Control which could provide some users with a very nice and neat two switch option.
I wasn’t able to get the Zybox for iOS to work with the new Switch Control – although it still worked perfectly with VoiceOver control under iOS 7. This is probably understandable as this external switch option in Switch Control seems to need to a Bluetooth keypress and the Zybox is a hard wired interface using the iPad/iPhone dock. I would imagine that this may also be an issue with the Perrero but I have been unable to test this as I don’t have access to one at this stage.
Having covered all that hardware – let’s go back to setting it up! Once you have a Bluetooth keyboard or switch interface setup, you need to go back into Switch Control (under Settings -> General -> Accessibility) and go into the submenu for switches once more.
At this point, you need to know how many switches the end user can access and you need to have these switches ready to go and plugged into the interface the end user will be using. I am going to set the system up with 1 switch and with 2 switches to give you different examples.
Single switch scanning
Thoughout this blog post I have sprinkled different videos, including videos of single switch scanning using Switch Control in iOS 7. You can also watch Luis Perez’s video on Switch Control in iOS 7 for a shorter summary. I have also explained much of the setup within the text of the blog post for people like me who do better with text versions!
To setup a single Bluetooth switch, I need to go into the Switches menu and select “Add New Switch…”. and choose “External”. Once the iPad prompts me to “Activate your external switch…” I simply press the switch. The iPad then sees the switch press and asks me to save it under a specific name – and pulls the onscreen keyboard up so that I can label it.
Once you have given it a name, the Actions menu appears. Since I am setting this switch up for single switch scanning, I am going to choose “Select item”.
And the video below shows all of the above happening and then demonstrates how scanning works in both iOS and in the Notes app.
When I set Switch Control up for an individual, there are also a number of settings which may need to be altered. The video below will walk you through the switch and scanning settings – or you can read below for a text based version.
Firstly, it is important that Auto Scanning is turned on. Without this turned on, single switch access isn’t possible.
I also need to look at the Timing settings. Auto Scanning Time is the speed at which the scanning cursor is going to move around the screen. The default is one second but each individual user may want it slower or faster than this. It is easy to increase and decrease this at increments of 0.5 of a second using the + and – buttons under Auto Scanning Time.
Pause on First Item is an interesting setting. ZYGO USA had this feature many years ago in their Macaws and many users were much more accurate with that extra delay on the first scanning item. it is definitely worth turning this on and trialing it.
Loops will be familiar to most people who use other forms of assistive technology. This is the number of times that the scan will cycle through before stopping. Most users I know prefer 1, 2 or 3 cycles but there is an option to go all the way up to 10 if needed.
The Auto Tap feature is one that some users may prefer – but requires quick switch timing. In this mode, every item is automatically selected after the switch is pressed – unless the user does a quick double switch press which will bring up the onscreen menu that appears after each switch press when this item is off. I look forward to trialling this with different users to see which option they prefer!
The Move Repeat option doesn’t work in single Switch Control so you can quickly move beyond that one.
There are also another couple of settings under switch stabilization that should be investigated. Firstly, Hold Duration. This is the length of time that a user will hold their switch down before the iPad interprets it as a switch press. This is ideal for some users who do quick accidental mishits of their switch. Turning this on means that the iPad will ignore these quick mishits and only respond to slightly longer, deliberate switch presses. Similarly, some users find they accidentally double hit the switch – and the second setting, Ignore Repeat, can be setup very successfully to ignore those second, accidental presses.
The next setting is called “Gliding Cursor”, which is the only setting for Point Scanning. This is a feature that the iPad defaults to whenever it cannot see relevant hotspots in an app. This is very similar to the crosshair scanner used by some computer switch interfaces and enables the user to select any point on the screen using a clever moving cursor. The speed of that gliding cursor can be controlled using this setting.
The next subcategory of features is audio. Sound effects turns on an audible click that accompanies the moving cursor. This is an option in many other assistive technologies and has often been helpful when someone is learning to use scanning – although they have often elected to turn it off as they become more proficient. Speech is an option for auditory scanning. This reads out the VoiceOver cues programmed into different apps – and as soon as you turn this on an extra menu item called Speaking Rate appears to enable you to control the speed of this voice. Unfortunately I found that turning this feature on caused some apps to crash and caused other apps to be unusable. Coupled with the fact that this relies on an app having VoiceOver cues recorded, this means that there will be many fewer apps that are accessible through auditory scanning than through visual scanning. In addition, the apps that work only with Point Scanning (the gliding cursor) are not able to make use of the auditory scan cues at all.
Included Menu Items is a subcategory that controls what appears in the little pop up menu that shows whenever a switch is pressed. This enables you to turn items on and off in this menu.
Group Items is the setting that causes the scan to first select a group of items. In traditional assistive technology the closest thing to this would be “row column” scanning. Due to the highly indivudualised nature of iPad apps there isn’t always a row – but the visual scan will cluster nearby items to enable faster scanning of the screen. Some users may find this difficult in the beginning – so I can see that this is a setting which might get turned off but will get turned on later on as the user becomes more familiar navigating around.
And finally, we have the visual category. Turning on Large Cursor makes the visual scanning cursor thicker and easier to see. The cursor colour can also be changed if needed or desired.
The next two videos show some extra features of switch and scanning access not seen in the previous videos. Point Scanning (gliding cursor) and some of the device control functions are demonstrated in the first video. The second video shows auditory scanning in action.
Two switch scanning
Two switch scanning is the preferred option for many switch users – for a wide range of reasons. Some prefer it because it is faster, others because it doesn’t have the same timing requirements. Two switch scanning is extremely easy to setup on the iPad – with the first switch moving the cursor around the screen and the second switch selecting the item. Most of the above settings still apply – but for this option to be successful you need to turn Auto Scanning off and you also need to set the first switch up to “Move to next item” and the second switch is set to “select item”.
The video below demonstrates this setup and gives a short demonstration of two switch scanning.
Using the Screen as a Switch
As well as the external Bluetooth switches and interfaces mentioned above, the iPad also has the option to use the screen as a switch. At this stage, the whole screen becomes a single switch – so all the information above about single switch scanning applies to this setting.
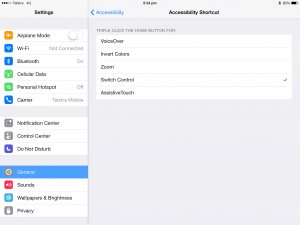
Before setting the iPad screen up as a single switch there is another setting that it is very important to have setup. You will definitely want to go to Settings -> General -> Accessibility and turn on the Accessibility Shortcut at the bottom of the Accessibility Menu. This setting allows you to triple click the Home button to escape from Switch Control. This is most important when using the whole screen as a switch as it allows you to quickly turn off Switch Control and use the screen as a touch screen once more. So just make sure that Switch Control is ticked under this menu. Generally, I find that this setting turns itself on automatically when Switch Control is enabled – but you might want to turn the other Accessibility features off to make it faster to get out of switch mode if you are just learning or experimenting.
Once you are happy with these settings, then go into Switch Control and set the screen up as a switch. You can do this by going into the Switches sub menu, selecting “Add New Switch” and then selecting “Screen” and “Full Screen”. Since you are currently limited to one switch scanning in this option, it is best to set the screen up to “Select Item” when the Switch Actions menu appears.
Now – you can operate your iPad using the screen as the single switch using all the settings discussed above.
Using the Camera as a Switch
Apple also offers an option to set the iPad/iPhone camera up as a switch. It can track your face movement and determine whether you have moved your head to the left or the right. This is an option that is only available in newer iPhones and iPads. Even with a 4th generation iPad I haven’t had a lot of success using it as it is very specific about the way in which you move your head and also requires good lighting to work well.
However, when setup successfully it will allow you to use your head for one or two switch scanning of the iOS. Once again, go into Switch Control and then into the Switches sub menu, selecting “Add New Switch” and then selecting “Camera”. At this point decide whether you are going to setup a “Left Head Movement” or a “Right Head Movement” or both. If you are just setting up one, it is best to set it up to “Select Item” when the Switch Actions menu appears. If you are setting up both, then you could do two switch scanning and should set one of them up as “Move to Next Item”.
And that’s my full rundown of the new Switch Control in iOS 7. I need to spend more time on gestures and custom gestures and will blog about them separately in the future.
Switch Accessible apps
As I mentioned earlier, there is also a range of apps that have been made switch accessible by their developers. These work with a different group of switch interfaces and may be an easier option for some users to master – but these options don’t allow the user to move from app to app – switch access is in-app only. For many users this switch access will be simpler and require fewer presses and steps. Many of the apps are also cause and effect type apps.
For these switch accessible apps, you also need to have an iPad switch interface – and there are several which have been released just to work with these apps. The good news is that most of those now also work with the new Switch Control in iOS 7 – giving you more bang for your buck!
There are several of these interfaces – and you can see the full list in my blog post on this topic from October last year. I expect this range to change now due to the extra options with iOS 7 – and AbleNet, for one, has already announced that they will be releasing a new edition of the Blue2 soon.
Once you have a switch interface, the next question is generally “which Apps are switch accessible?” To help with this question, Alex Dunn from Inclusioneers and I put together a Switch Accessible Apps resource (edited to add that this list has been discontinued). The resource lists all the apps that we are currently aware of that have switch access, details the type of switch access (e.g. cause and effect, 1 switch scanning, 2 switch scanning, visual scanning, auditory scanning) and also lists which switch interface(s) the App is compatible with. Alex and I are working on keeping this updated – so if you find any Apps missing or have any comments please let us know!
And I hope you’ve found this blog post useful – and you probably deserve a medal if you’ve made it to the bottom of this extremely long post! I’d be really interested to hear how other people are going with all the new options for switch access – and, as always, really happy to receive comments about this post.
Cheers 🙂


Barb Lyons
Jane
David Harraway
Jane
Adam Lynn
Jane
Janelle
Jane
Gina
Jane
Pingback: PATINS PROJECT -Rapid Fire- - It’s TTA Grant Time!
Pingback: Switching it up in iOS 7 | The Spectronics Blog
Colin Dean
Jane
Brian Franklin
Jane
Jane
Kati
Jane
Kati
Jane
Neil scott
Jane
Sliderr
Sliderr
Jane
Bronwyn
Jane
Bronwyn
Jane Farrall
Richard Sidal
Jane
Sliderr
Pingback: How do I use a switch with an iPad? iOS 7 Overv...
Sliderr
Jane
Sliderr
Jane
Lindsay
Jane
LHedley
Jane
Sue
Jane
Sue
Jillian
Jane
Heather Weaver
Jane
Sliderr
Jane
David Harraway
Bronwyn
Jane
David Harraway
Rachel Wright
jane
Amy
jane
Bek
jane
laura
jane
Glenda
jane
Kristin Leslie
Kristin Leslie
jane
jane
Lily
jane
Kjersti Lorentzen
jane
Georgia
jane