
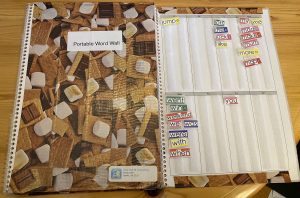
Portable word walls are an important part of our toolkit when working with transitional and conventional literacy learners.
I’ve written a number of posts about how to setup a word wall and how we use them – in both the working with words block and in writing.
After my recent post about Using the Word Wall in Writing, a couple of people have asked me about making portable word walls. So here goes!
To make your own portable word wall you will need:
- a template to print and laminate (see below)
- you will need some card or coreflute board as the backing
- glue or double sided tape
- some duct tape
- adhesive hook and loop (Velcro)
- word wall words printed at 20% of their regular size
- optional – binding coils depending on the backing board you are using
The first step is to print the template. Choose the appropriate one for your paper size below.
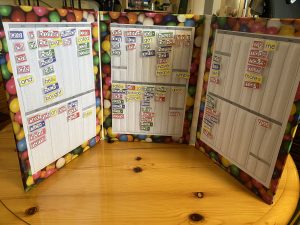
Once you have printed and laminated your template pages, cut the backing card or coreflute board to a slightly bigger size than the template. For the one I’m making today I’m using coreflute board – it’s easy to cut, lightweight, strong, and durable. I have also used binder covers and cardboard successfully. You need the board to stand up independently on the student’s desk – so the back needs to be stiff enough to do that – and the two side panels act to add stability.
Use the double sided tape or glue to stick the template to the backing boards.
Once you have all three pages of the template stuck onto their backing boards, then you need to bind the word wall.
Your choice of backing board, will impact how you bind the word wall. In this example I’m using coreflute board, which is too thick to fit through my binder – so I will bind this one using duct tape. The photo at the top of this page is one I made using cardboard – and that one I chose to bind using my coil binder.
If you are going to bind the word wall with duct tape, it’s important that you make sure you leave enough room in the hinges for the word wall to fold up. I find it is easiest to do this by putting the three sheets on top of each other and then applying the duct tape while it is in this position.
Once you have bound the word wall then add some more duct tape around the edges of the template pages to securely fix them to the backing boards. If you’re like me, then you might add “pretty” duct tape all over – just because it looks good! You can see in the example below that I have used plain duct tape for the hinges, and pretty duct tape to attach the template sheets to the backing. I also covered the other side with the pretty duct tape (of course!).
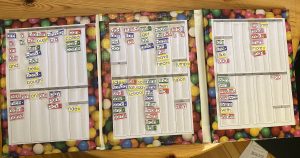

And the final step is to add strips of female (fuzzy) velcro along the template pages to attach the word wall words to as needed.
(And just as a reminder you should print the words for your portable word wall at 20% of normal size).
And make sure the word wall is upright on the student’s desk – this gives them room to write and lets them use the word wall in the same way as a large word wall.
Happy word walling!
